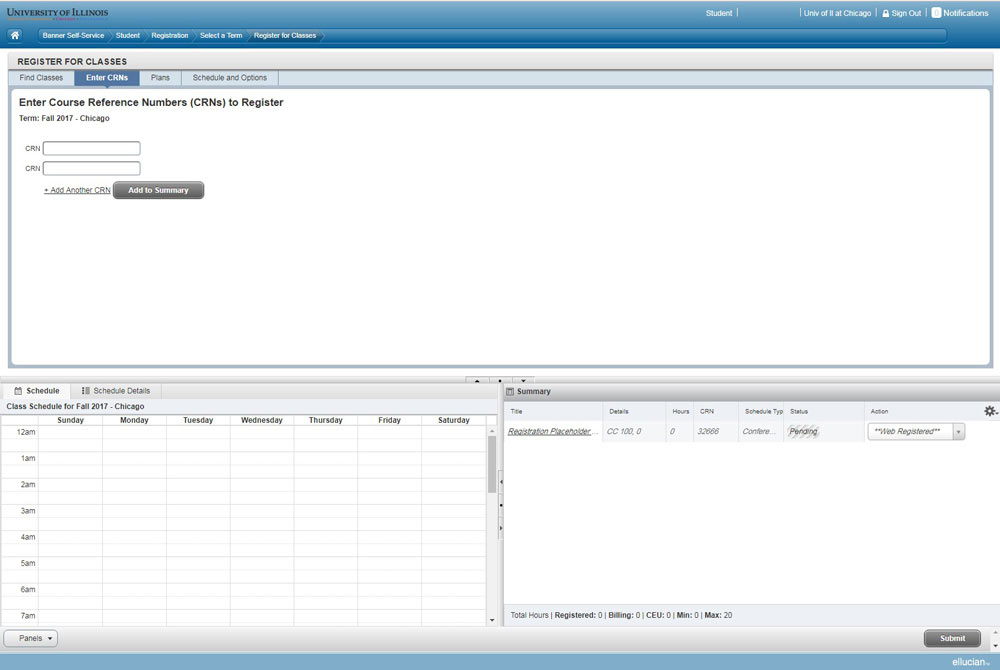
Using XE Registration
Overview
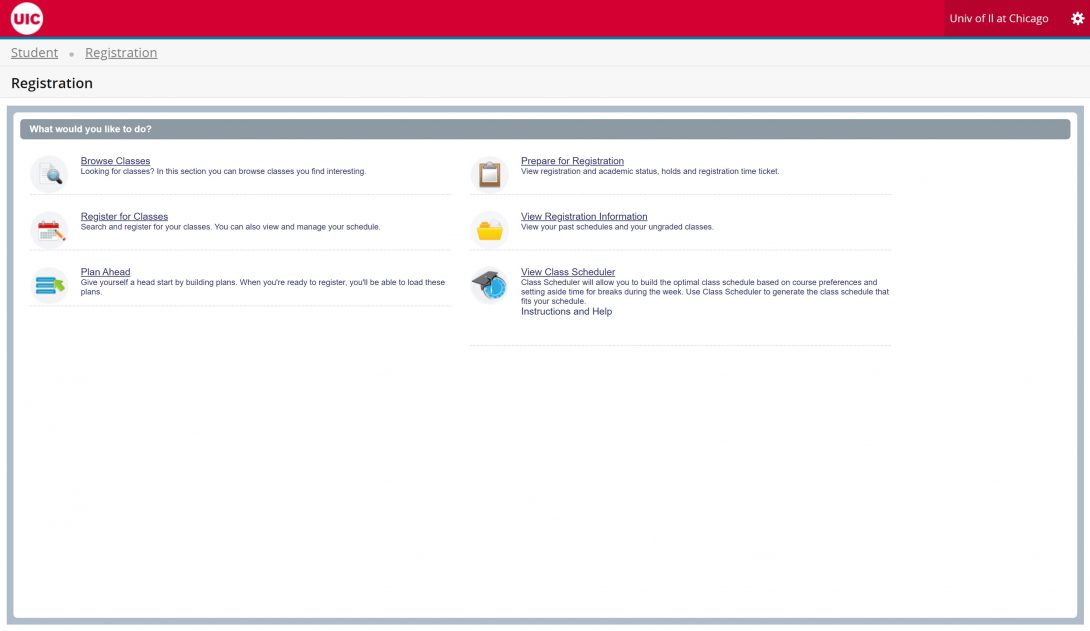
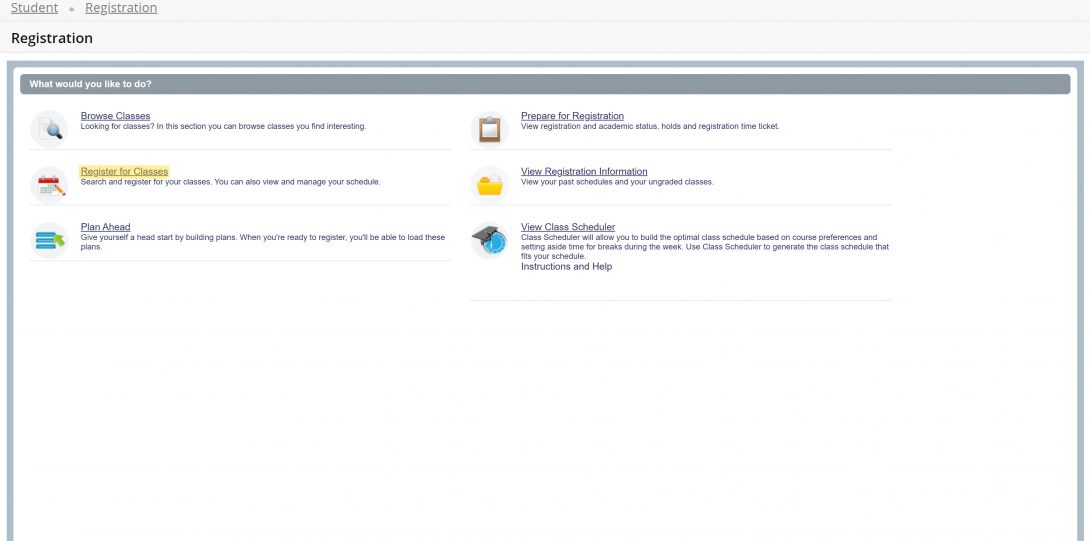
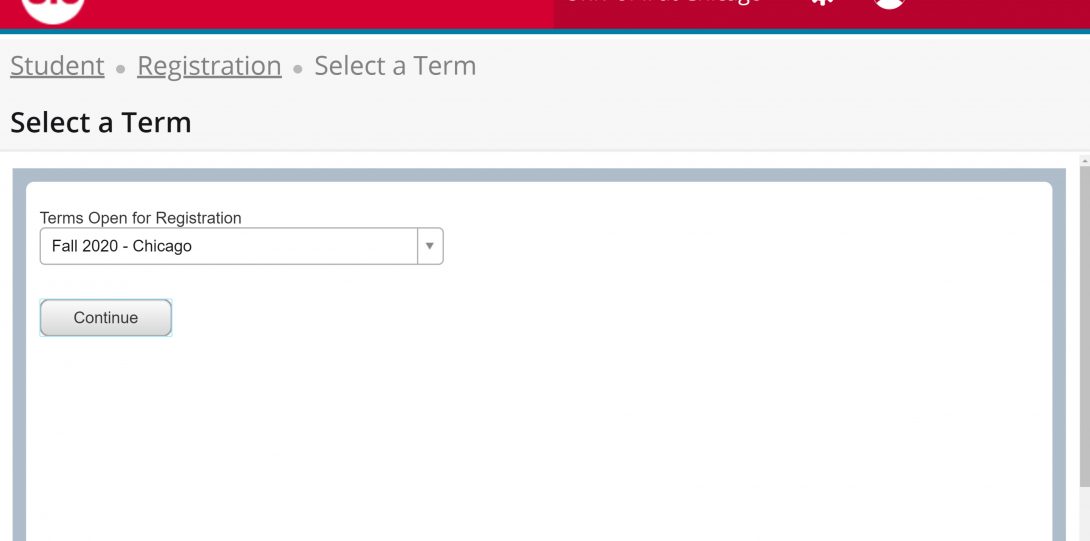
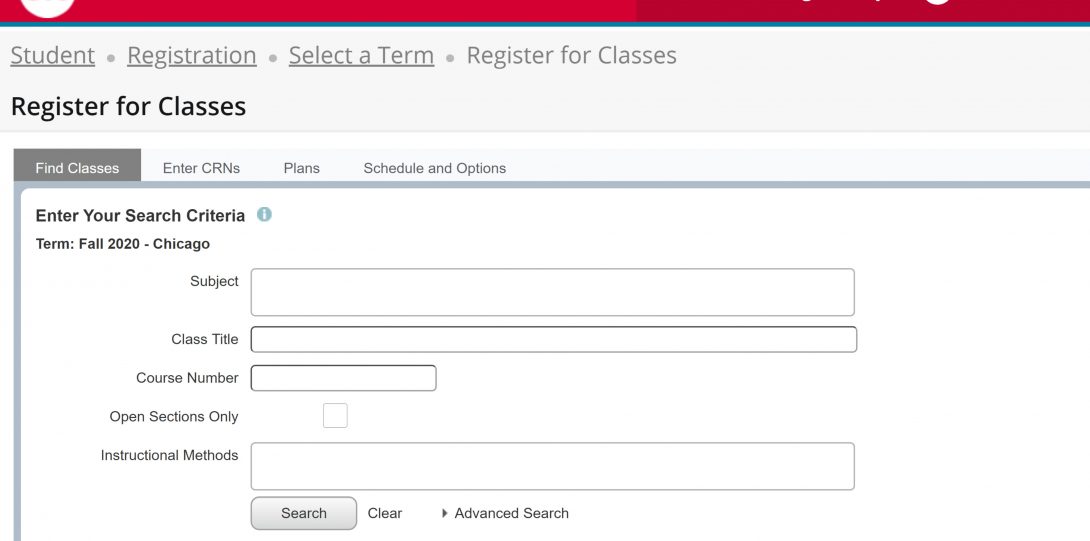
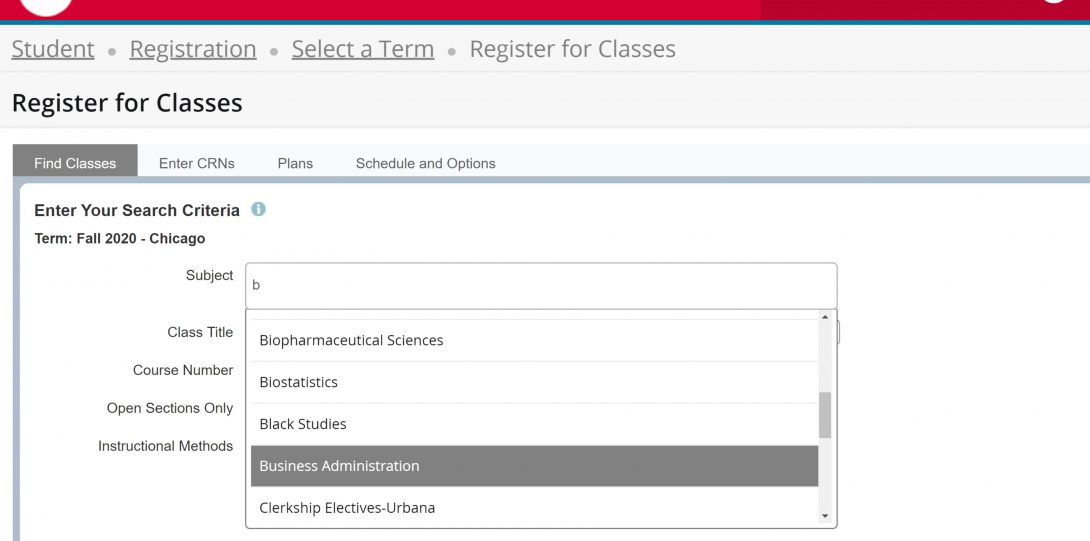
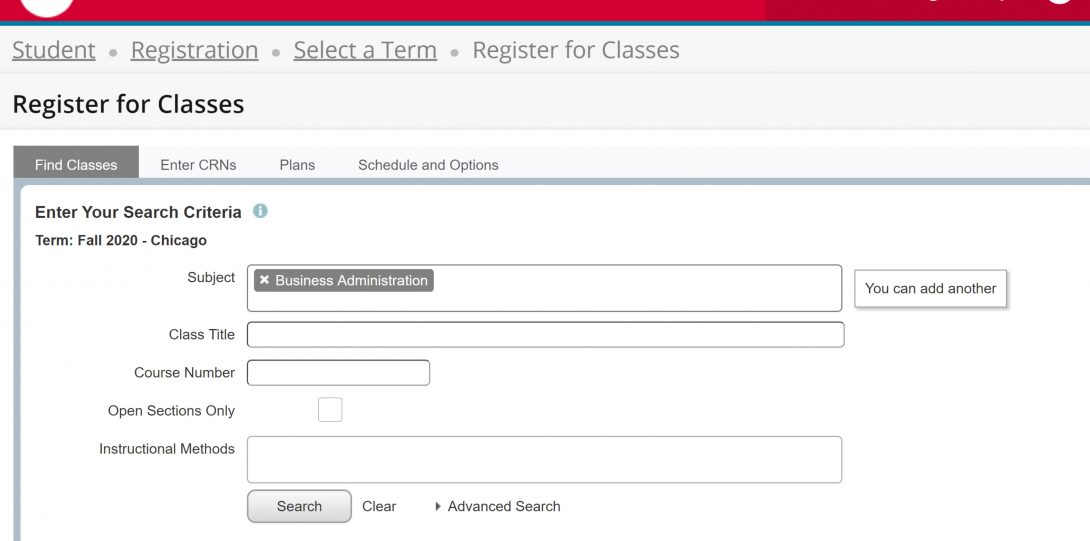
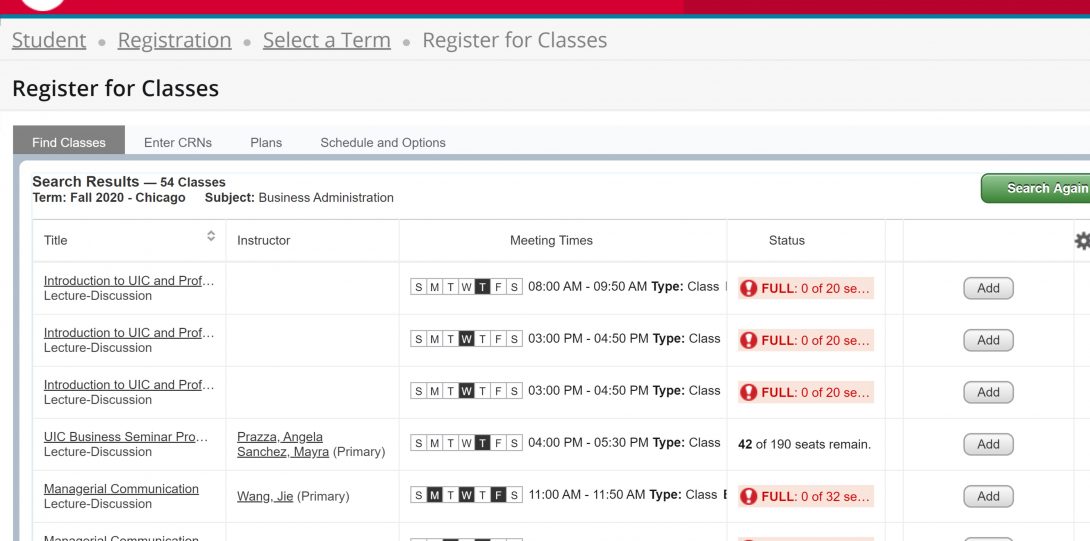
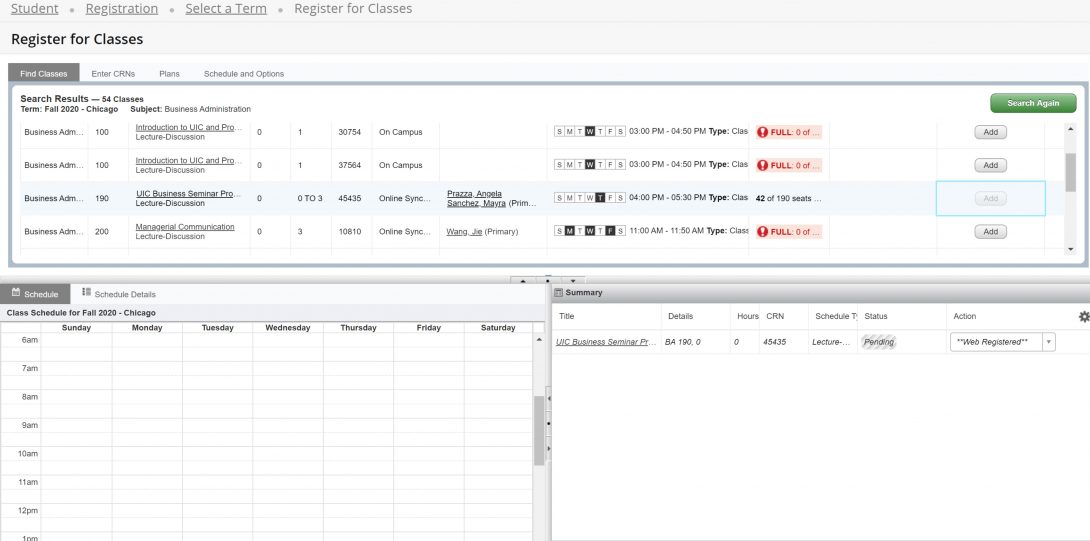
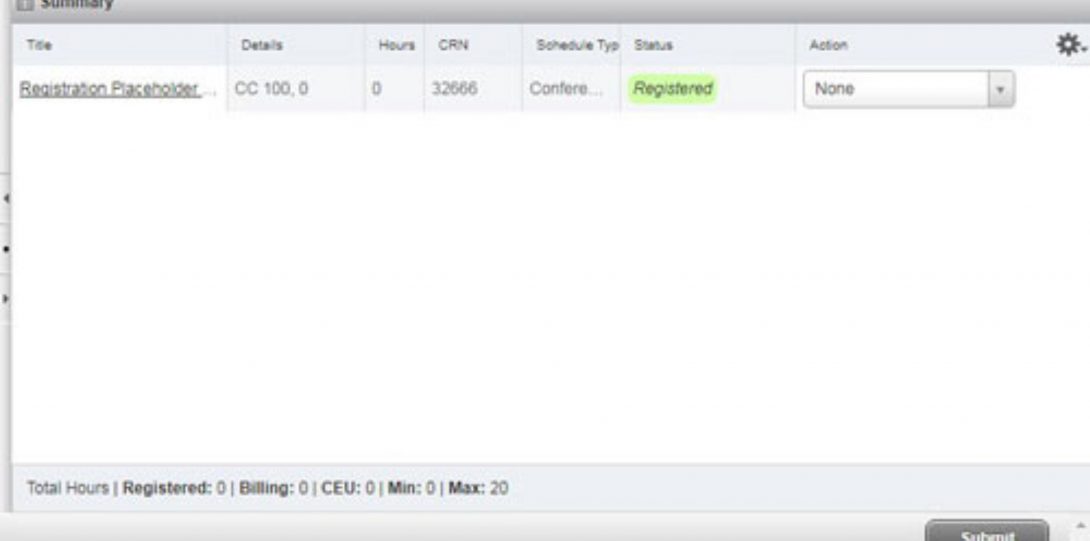
Banner XE is a new look and feel for registration processes at UIC. The images and information below provide a step by step process to register for classes. Banner XE allows for greater search capabilities for classes and more streamlined registration. If you have questions, contact Registration Services at registration@uic.edu. If you need additional assistance and would like for a staff member to give you a call back, please let us know what your question is, along with your UIN and a call back number and we will give you a call back.
Advanced Search Instructional Method
Instructions on how to search for courses that are either on campus, asynchronous or synchronous.
Advanced Search Option (pdf)
Class Scheduler
Class Scheduler will allow you to build optimal class schedules base on course preferences and setting aside time for breaks during the week. Use the Class Scheduler to generate the class schedule that fits your schedule.
Error Messages
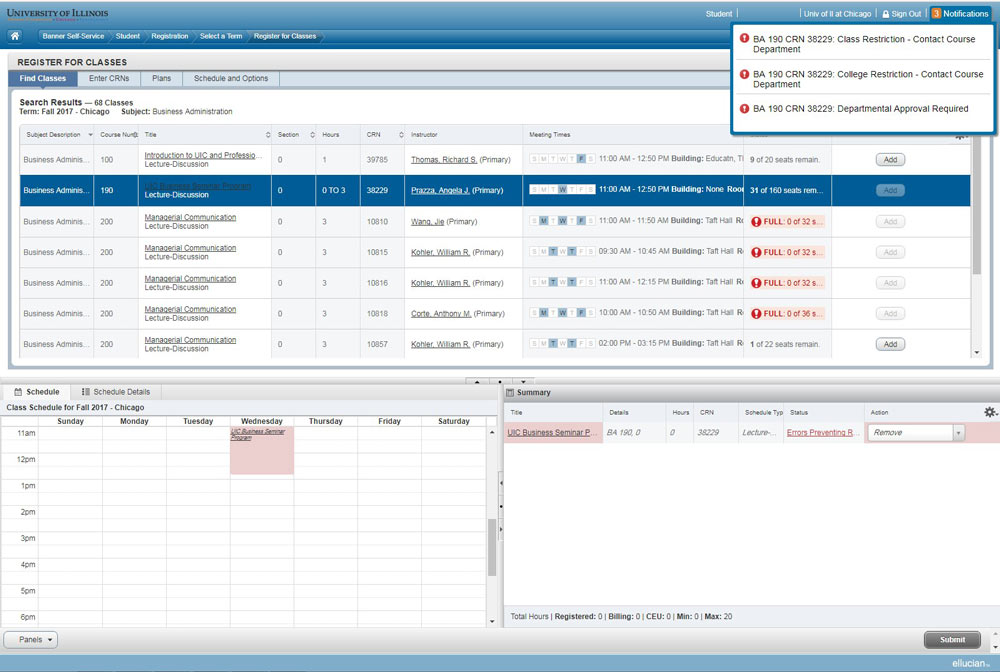
If unsuccessful while trying to add or remove a course(s), error message(s) will appear at the top and status will say “Errors Preventing Registration”. Contact the course department if it is a “Departmental Approval Required” or “Class Restriction” or “College Restriction” error message. If “Linked Course Error” appears, continue reading about linked courses.
Linked Courses
Courses that require an additional section to complete enrollment are called LINKED COURSES. These are common for some Math, Science, and major core courses.
To properly register for linked courses, follow these steps:
Linked Courses Instruction 1
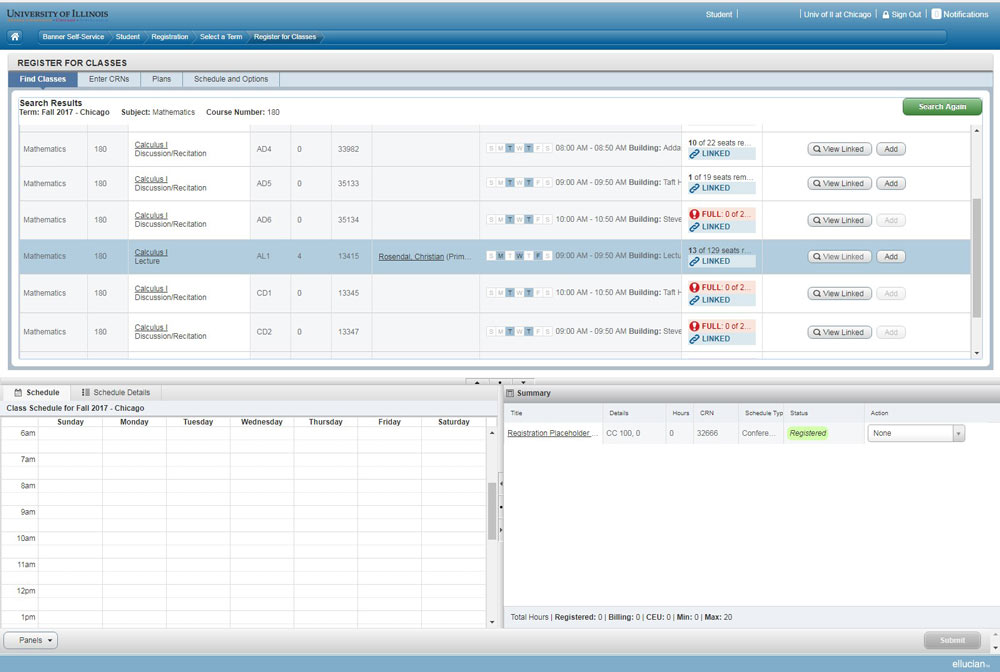
While on the register for classes page, select “View Linked”. Keep in mind that the first letter under section has to match. Example: “AL1” goes with “AD4”.
Linked Courses Instruction 2
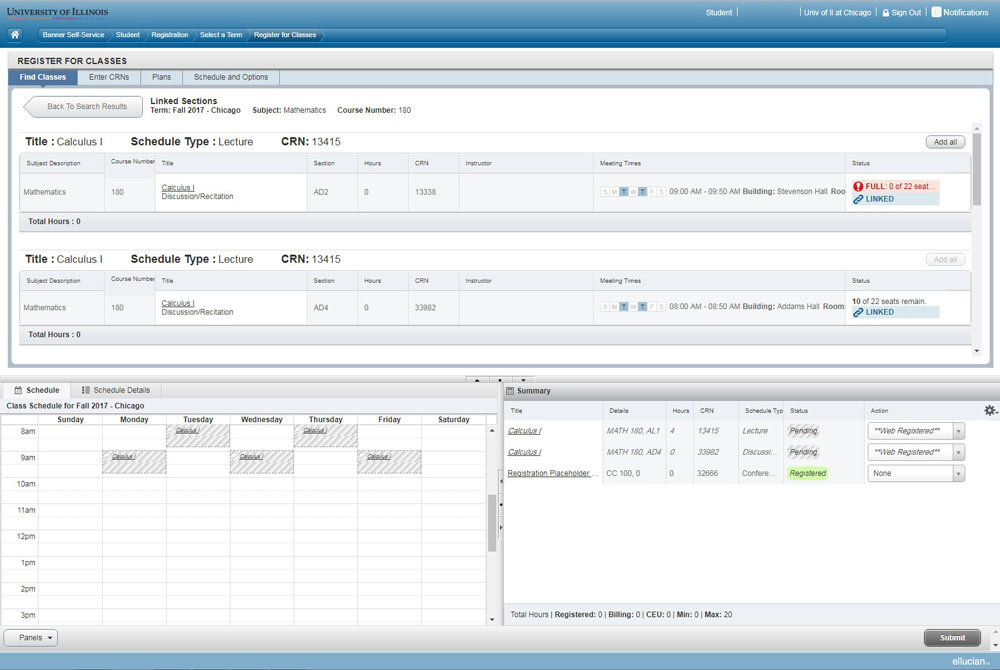
Scroll through the options. Click “Add All” and then click “Submit”.
Determining Class Meeting Time and Location
Your class location may be set as one of the following
- On Campus: A course organized around scheduled meeting days and times and that takes place entirely on campus in the location(s) listed on the UIC schedule of classes. None of the scheduled class sessions, including lectures, discussions, secondary sections led by teaching assistants, and exams, may take place online.
- Online synchronous: A fully online course organized around scheduled meeting days and times as listed on the UIC schedule of classes. Classrooms will not be assigned for these courses. Scheduled course activities may include weekly lectures, discussions, secondary sections led by teaching assistants, and exams. Blackboard may be used for students to participate in online learning activities.
- Online Asynchronous (online with deadlines): A fully online course with no required on campus activities or any mandatory face-to-face class sessions; thus, no meeting days or times will be listed in the UIC schedule of classes. All course activity, including assessments (which may include proctored exams), is done online. Students use Blackboard to participate in online learning activities each week. Coursework is completed on students’ own time while still meeting deadlines.
- Synchronous distributed: A course in which in-person students simultaneously meet with synchronous online students via live streaming technology such as Echo360.
- Hybrid (also called Blended) course: A course that combines on campus instruction with online (synchronous and/or asynchronous) learning activities. In hybrid courses, educational technology is used to supplant some portion of on campus instruction, reducing the time spent in the physical classroom. The on campus and online synchronous course components are organized around scheduled meeting days and times listed on the UIC schedule of classes.
- Off campus experience: A course that takes place off the UIC campus and may use on campus instruction, online synchronous or online asynchronous instruction, or a hybrid format. An example of this could be student teaching, internships, or health science college clinical experiences.
https://registrar.uic.edu/registration/policies_procedures.html (under Glossary Of Terms)
Changing Number of Credit Hours
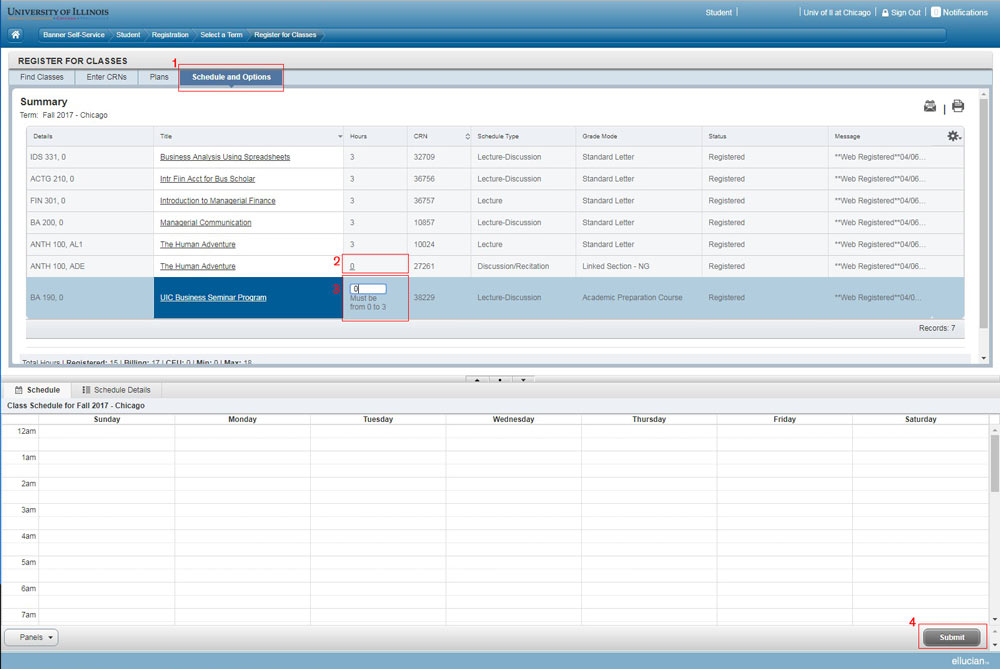
Changing the number of credit hours for a course can be requested. If approved, you follow these steps to make the changes for your account:
- From the home page, click the “Schedule and Options” tab.
- Under “Hours”, click the underlined number next to the course.
- Once the text field appears, proceed to change to the approved number of hours.
- Finally, click “Submit” at the bottom right.
Waitlisting Instruction 1
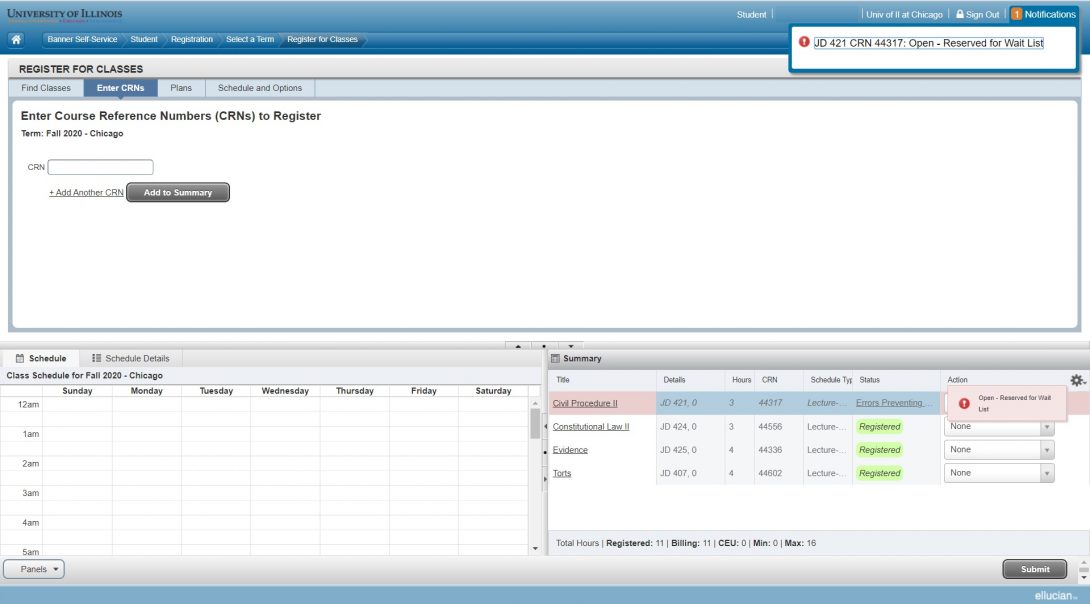
You will find out if a class has a waitlist after you add a course to your “Summary” and click on the “Submit” button. If the course is full but has waitlist seats available, you will see the above messages.
Waitlisting Instruction 2
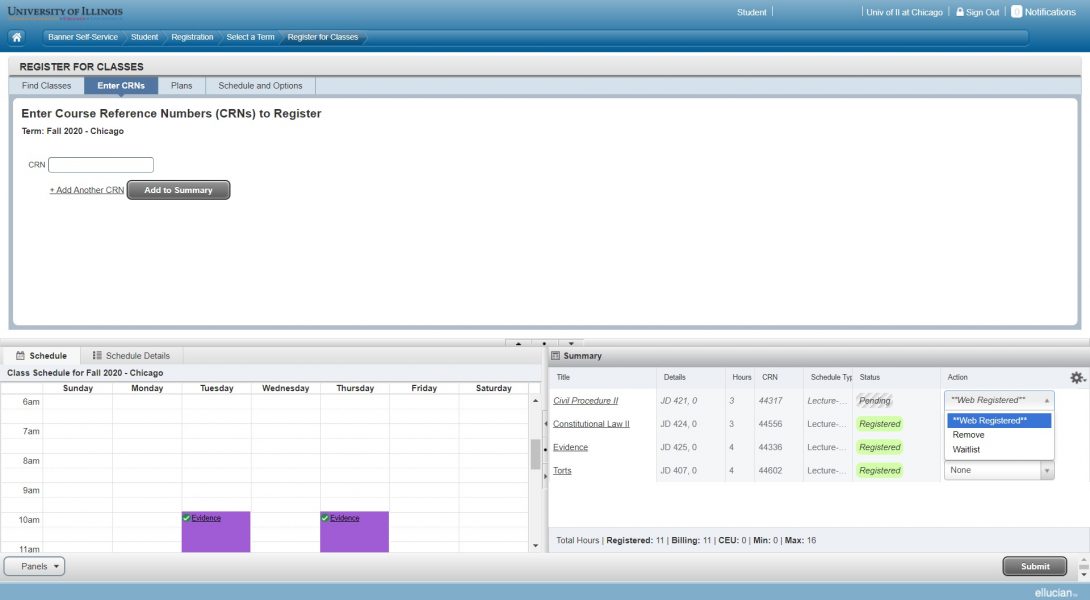
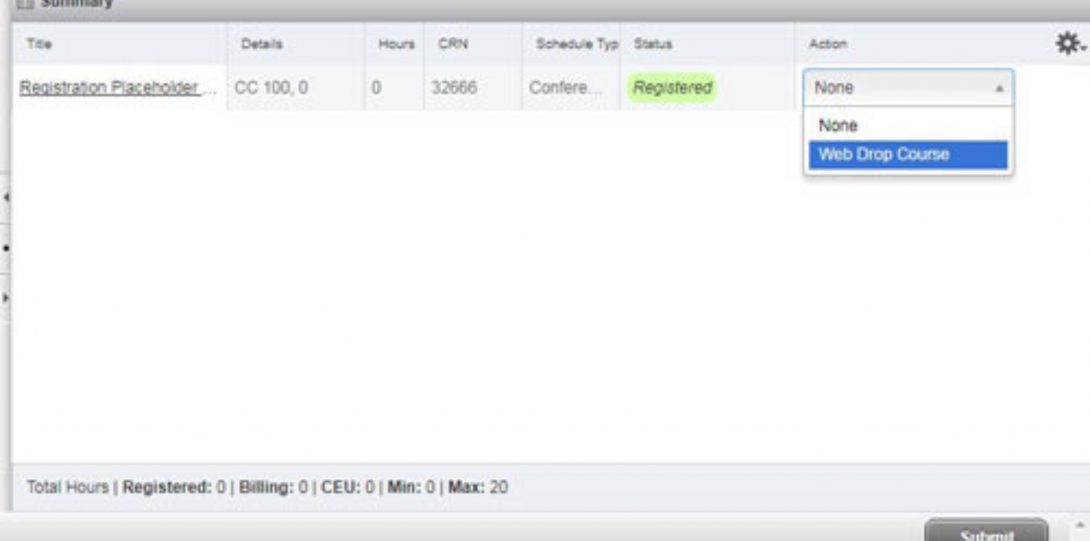
To attempt to get on this course’s waitlist, you must select “Waitlist” from the dropdown menu under “Action”.
Waitlisting Instruction 3
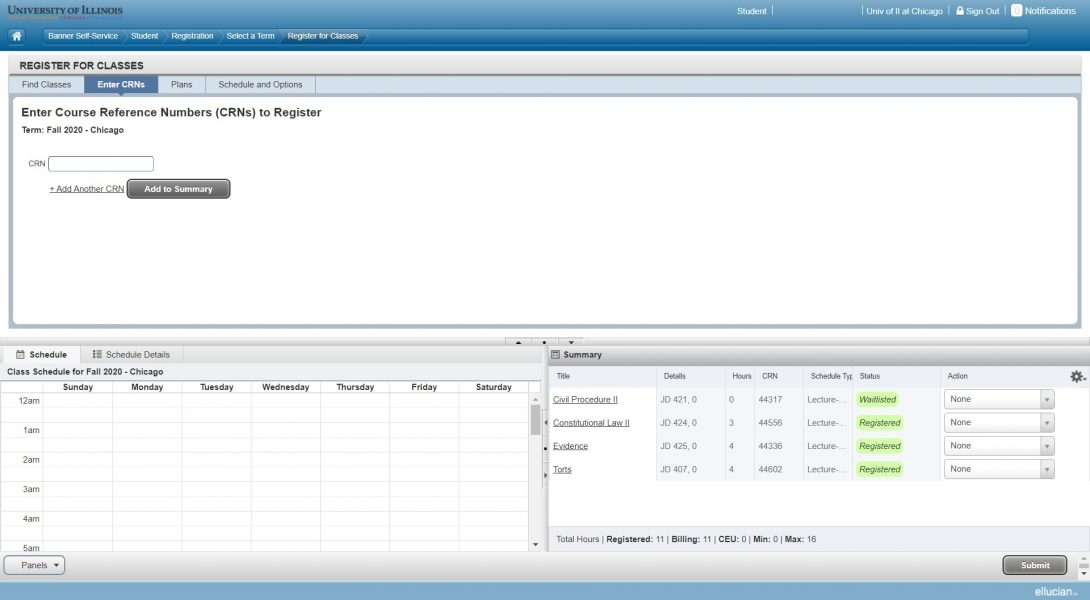
Next, click on the “Submit” button. If you were successful, you will see the Status for the course now show “Waitlist” in green-highlight.
If you are having trouble getting on a waitlist for a course, view the Error Messages section above on this page for further information.
Once a seat opens up for you, you will be notified via email that you have 24 hours to actually register for that seat. You will receive an email like the following:
Dear (Your Name),
An open seat is available for you in (Course Subject and Number), (CRN Number) for the (term you are registering for).
You have from (Date and time this email was sent) through (24 hours later) to claim your reserved seat before it is offered to the next student on the waitlist.
To register for the section listed above, log into my.uic.edu, click on Banner XE Registration and register for the class.
NOTE: If you do not claim your reserved seat within the time frame listed above you can add yourself back to the bottom of the waitlist.
If you have any questions, please contact the department offering the course.
Thank you,
Office of the Registrar
(Your UIN)
Quick Links
| Registration Services | Calendars | Financial Matters |
| Student Records | Transcripts | Campus Policies |
| Registration FAQ | FERPA |
